Prenatal Care for Clubfoot – What Expecting Moms Need to Know

Prenatal Care for Clubfoot – What Expecting Moms Need to Know

Discovering that your unborn child appears to have a physical difference during an ultrasound can be scary. The news is often unexpected and can lead to thousands of questions about how it will affect your baby. One thing that is commonly identified during the anatomy ultrasound scans is clubfoot, a condition that causes one or both feet to turn inward and downward. While the condition does require treatment, it often can be corrected without surgical intervention.

Our team in the Center for Excellence in Foot led by Anthony I. Riccio, M.D., meets with parents whose babies are diagnosed with clubfoot prenatally and begins treating these children quickly after they are born, beginning interventions within one to two weeks of birth. Learn more about what to expect during the clubfoot treatment process below.

What is clubfoot?

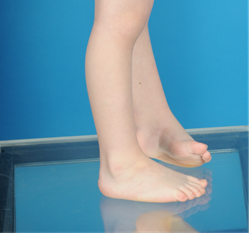
Clubfoot is a congenital (from birth) disorder in which the foot points down instead of straight and turns in, pointing toward the opposite leg. Clubfoot is one of the most common pediatric musculoskeletal conditions that requires treatment by a pediatric orthopedic surgeon.

A clubfoot is not a normal foot that is just twisted and turned into an abnormal position. The outward deformity is created by structural differences inside the foot. The method of treatment for clubfoot cannot alter the structural differences inside the foot. The treatment method takes the structurally abnormal foot that is in an abnormal position and puts it into a series of casts, which slowly turns the foot until it is in a normal position.

If left untreated, clubfoot will make shoe wear problematic and can lead to serious problems, severely limiting activities and even causing difficulty walking.

Prenatal Clubfoot Care: 20 weeks to 40 weeks gestation

Clubfoot can be diagnosed in unborn babies during the mother’s 20-week ultrasound in which the obstetrician or maternal fetal medicine physician reviews anatomy. During this ultrasound, if one or both feet appear to be abnormal, the doctor will refer the mother to visit with an orthopedic specialist to discuss treatment options.

The first appointment with our clubfoot expert Anthony I. Riccio, M.D., consists of a one-on-one conversation about clubfoot and how it is treated. In this appointment, Riccio answers questions that parents have about the condition and educates them on what to expect. This can greatly help a family feel less anxious about the future of their baby and assuage fears about any future disability.

Newborn Clubfoot Care: 1 to 2 weeks old to 2 months old

Riccio encourages families to spend a few days at home enjoying their newborn and then calling Scottish Rite for Children for an evaluation. Ideally, treatment for clubfoot will begin with the first couple of weeks of the baby’s life.

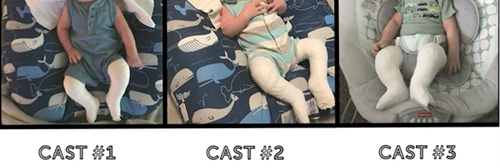
Typical treatment for clubfoot in newborns consists of the Ponseti method, which uses a series of casts and then braces to correct a baby’s clubfoot and prevent its recurrence. In newborns, the first step is to determine the severity of the condition and begin casting.

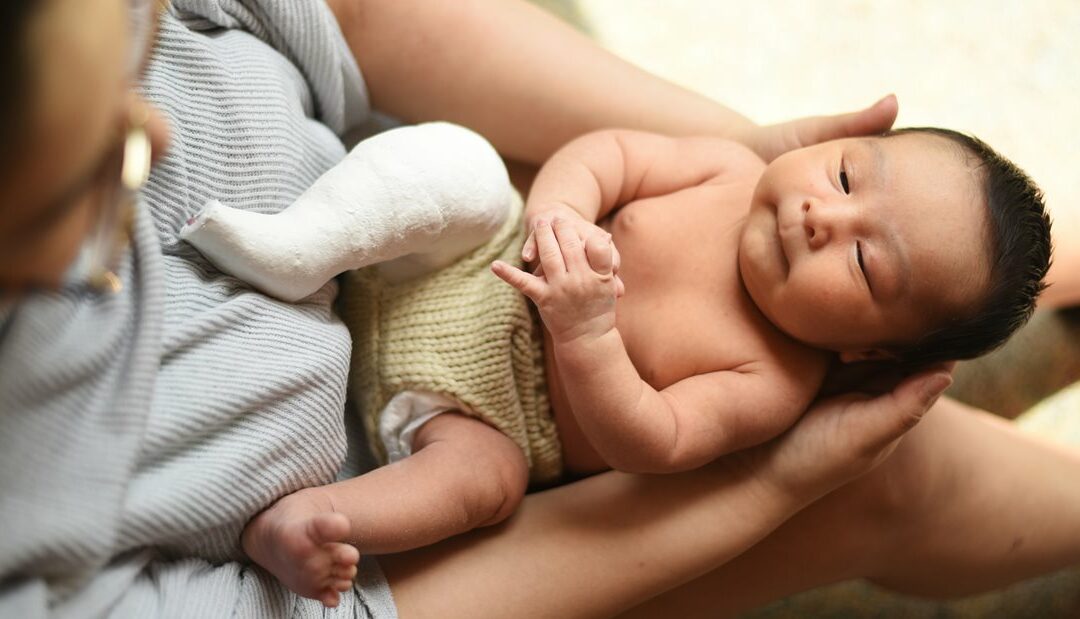
In serial casting, a cast is applied to the foot or feet once a week for three to five weeks. This brings the foot from upside down and turned inward position to a right side up and turned outward position. In some cases, a simple procedure under local anesthetic is performed to release tightness in the Achilles tendon and bring the foot into a normal position. After three to five weeks of progressive casting, a final cast is applied to hold the foot in the normal position for three weeks.

Infant Clubfoot Care: 2 months old to 7 to 12-months-old

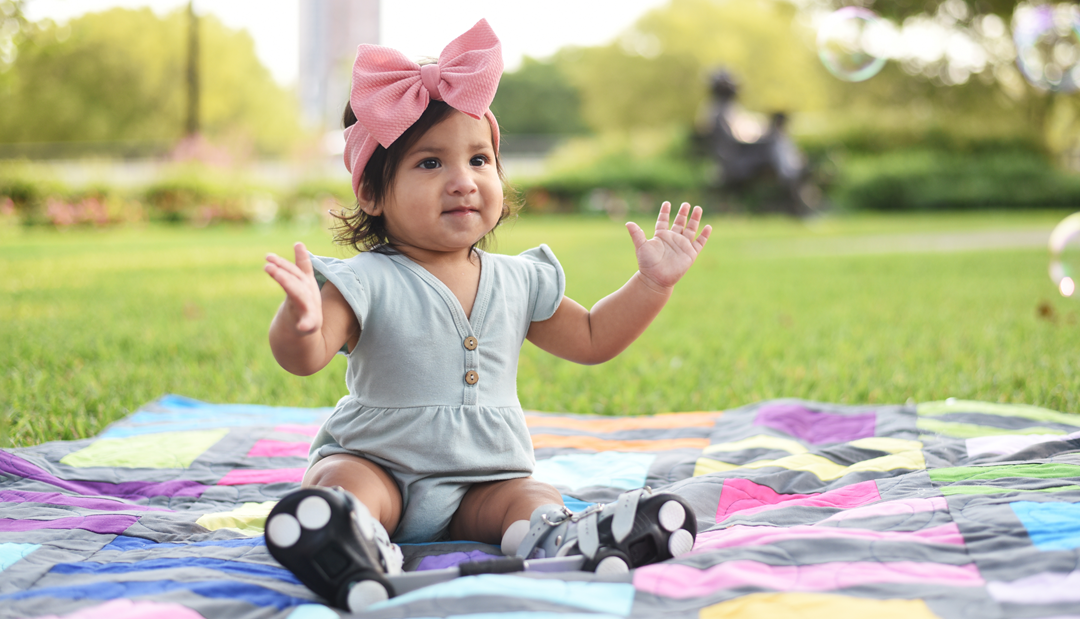
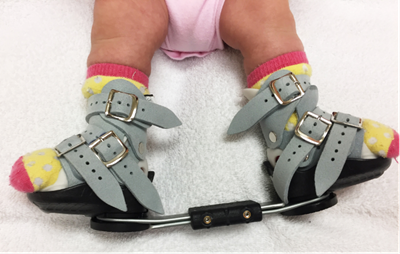
After serial casting is completed, the next phase in clubfoot treatment is bracing to maintain the correction that was achieved through casting. Babies will wear a brace called a boot and bar brace consisting of soft silicone lined shoes with soft suede straps. These shoes are connected to each other by a bar to keep the feet turned outward.

Scottish Rite follows the protocol set by the International Clubfoot Congress of wearing the brace for 23 hours a day until the baby is beginning to pull up to stand, which usually happens between 7 to 12 months of age. Bracing does not interfere with the baby’s ability to reach developmental milestones, such as rolling over, sitting independently or crawling.

Toddler Clubfoot Care: 7 to 12 months old to 4 years old

After the baby begins pulling up to stand, wearing of the boot and bar brace is transitioned to nighttime only until the child reaches age 4. If bracing is not done in its entirety, the risk of clubfoot recurrence approaches 100%.

According to research at Scottish Rite, 70-80% of children will not require further treatment after the Ponseti method. Unfortunately, because clubfoot is a structural, congenital difference, approximately 20% of children will relapse and need further treatment, despite the medical providers and families doing everything correctly.

While clubfoot care may seem daunting, it is a safe and pain-free process that will give your baby the best outcome and prevent them from having difficulties later in life. Our team in the Center for Excellence in Foot stay with our patients and families every step of the way.

Learn more about clubfoot.

Infantile Clubfoot Deformity

Infantile Clubfoot Deformity

Clubfoot deformity occurs in one in 1,000 live births, making it the second most common congenital deformity of the foot (after postaxial polydactyly) and one of the most encountered infantile musculoskeletal congenital differences. In contrast to other common infantile foot deformities, such as metatarsus adductus and calcaneovalgus deformities, a clubfoot is not a normal foot that has been “packaged” into an abnormal position. Rather, a clubfoot is a true congenital deformity. There are structural differences inside the foot that create the outward deformity. The shape of the tarsal bones is not the same as that of a child with a normal foot. The elasticity of the soft tissues is much less than in a child with a normal foot, and arterial vessels are often absent or aberrant. Some of the extensor muscles in the leg have been shown to have an exponentially higher number of contractile elements (actin and myosin filaments) and are thus able to generate force at what is essentially a superhuman level.

Despite our understanding of the underlying anatomic and histologic differences in clubfeet, the exact etiology of the deformity remains unknown. Although genetic aberrancies have been identified that are associated with the clubfoot, these appear to be a result of somatic mutations, and thus, the deformity does not appear to run in families with any identifiable pattern of inheritance.

In approaching the treatment of a clubfoot, it is essential for families and providers to understand the presence of these congenital differences because our method of treating clubfoot cannot alter any of them. We can’t change the shape of the bones. We can’t improve the elasticity of the soft tissues. We can’t change the way the blood vessels move into the foot, and we can’t change the power with which certain muscles fire. Therefore, the goal of clubfoot treatment isn’t to create a normal foot. Rather, the goal of treatment is to take a structurally abnormal foot, which is also in an abnormal position, and through a series of casts applied weekly, slowly convert into an abnormal foot structurally that is ultimately in a near normal or completely normal position. Also, this method limits the need for surgery, which creates scarring and stiffness, thereby preserving as much motion of the foot as possible.

The Ponseti method of treatment is the gold standard of care worldwide for clubfoot deformity. This involves weekly serial casting of the involved foot or feet, with each cast applied in a manner to correct a different component of the clubfoot deformity. These casts are very effective at correcting every component of the clubfoot deformity with great success, save for the contracture of the Achilles tendon, which drives an oftentimes rigid equinus (plantarflexion) deformity of the ankle. Approximately 90% of clubfeet require a percutaneous transection of the Achilles tendon. This is performed in the clinic with topical anesthesia in children aged less than 3 months to overcome this component deformity. Following the heel cord tenotomy, the ankle can be acutely dorsiflexed to at least 10 to 15 degrees, and that position is maintained in a final cast that is kept in place for three weeks.

On average, it takes about four weeks of weekly casting to correct the component deformities of the cavus, hindfoot varus, and metatarsus adductus. That brings the foot from what is essentially an upside down and turned inward position to a right-side-up and turned-out position. At that point, if the ankle remains in equinus, this deformity is corrected with a heel cord tenotomy and a final three-week cast, resulting in a total time to achieve full correction of about seven weeks. As we ideally begin treatment within one or two weeks of life, most deformities are corrected by or before 2 months of age.

It cannot be overstated that deformity correction is just the first part of the treatment of a clubfoot deformity. Maintaining that correction is essential and, in many regards, more difficult. Seven weeks in a cast simply cannot overcome months of intrauterine gestation and the various congenital differences present within these feet. Without a means of maintaining correction, corrected clubfeet will universally and quickly revert to their initial position of deformity.
Maintenance of correction is achieved by keeping the ankles dorsiflexed and the feet externally rotated in what is typically called a “boot and bar” construct. While there are a variety of Ponseti-type braces available, most consist of soft silicone lined shoes with soft suede straps. Regardless of whether the deformity is unilateral or bilateral, these shoes are applied to both feet and connected to each other by a bar. The bar holds the shoes at 60 to 70 degrees of external rotation, and the shoe straps hold the ankles in neutral dorsiflexion.

Though bracing protocols vary to some degree, our protocol mirrors that agreed upon at the International Clubfoot Congress and consists of brace use for 23 hours a day until the child begins to pull to stand and 12 hours a night thereafter until age 4. The braces do not interfere with the achievement of developmental milestones, such as sitting up, rolling over, crawling or standing. The transition from full-time to part-time use is based entirely on the fact that once a child is able to pull to a standing position, they will soon spend more time on their feet. At that time, their own body weight will help to keep their feet flat on the ground. Until that time, babies spend most of their time lying down and sitting, during which the feet are held in a relaxed position. That can result in tightening of the heels cords and a recurrence of equinus.

Bracing is most difficult on parents for the first two weeks after the child comes out of their post-tenotomy cast. After seven weeks of casting, having anything other than cast padding surrounding their feet feels different and can cause fussiness. Parents are counseled extensively about this so they can anticipate and develop strategies to keep the braces in place despite frustration on the part of the child.

As mentioned, the use of the brace and the prescribed protocol is essential to long-term treatment success. If the braces aren’t used as recommended, the risk of recurrence of the deformity approaches 100%. These recurrences can be much more difficult to manage in older children than during infancy. It typically requires repeat casting and general anesthesia for either a repeat heel cord tenotomy or a more invasive surgical intervention.

Unfortunately, even when perfect correction is achieved with casting, and parents are compliant with brace use, a percentage of these deformities still recur and require additional treatment due to the structural congenital differences present. Research has demonstrated that with parental bracing compliance, about 80% of clubfoot patients never need any additional treatment. However, despite everyone’s best efforts, 20% of children still need some additional treatment due to recurrence. These recurrent deformities are most commonly the result of an imbalanced muscle pull across the foot due to a relatively overpowered tibialis anterior tendon. When relatively overpowered, this muscle, due to its insertion along the medial aspect of the foot, supinates the foot during dorsiflexion. That results in the touchdown of the lateral border of the foot during the initial stance phase of gait. This supination, in turn, slowly drives the foot inward and into further supination with weightbearing. Such recurrences are easily managed with a brief period of repeat casting to correct any relapsed deformities. That’s then followed by a transfer of the offending tendon to the dorsum of the foot to remove that supination moment during dorsiflexion.

With an experienced team of providers and parental dedication to brace use, these initially dramatic foot deformities can be corrected beautifully and without any long-term deficits or disabilities. However, it is important to educate parents early regarding certain differences in the foot or feet following treatment. A clubfoot is always smaller than a normal foot, sometimes half to a full shoe size smaller than an unaffected contralateral foot. In addition, the calf musculature of children with clubfoot tends to be smaller, though this size difference does not appear to affect strength. These differences are strictly cosmetic and do not alter function. The goal of clubfoot treatment is to allow a foot or feet to sit flat to the ground, have as much flexibility as possible, allow the child to wear any shoes they want, play any sports they want, have any job they want, and do whatever they want with the foot. In achieving this, their corrected clubfoot will function no differently than a normal foot and will never limit a child in any way in any activity they desire.

Download the PDF.

Dr. Anthony I. Riccio is a pediatric orthopedic surgeon and the Director of the Center for Excellence in Foot at Scottish Rite for Children.

Share Your Story: I Got This

Share Your Story: I Got This

Meet Ella, a patient who is treated by our experts in the Center for Excellence in Clubfoot and Foot Disorders. Learn more about her journey below. Blog written by Ella’s mother, Lindsay.  I was about halfway through my pregnancy when we found out that our baby, Ella, would be born with a clubfoot. Our standard anatomy scan revealed we were going to have a baby girl, plus indicated there might additional issues going on.  

Our doctor referred us to a specialist, where we learned that Ella most likely had a rare heart condition called Tetralogy of Fallot, in addition to clubfoot. In order to confirm the heart condition, her little heart needed more time to grow and develop. That waiting period was very stressful, but after a couple of weeks and many prayers, we learned that Ella had a healthy heart. She still had clubfoot, so we then went to a different specialist in Oklahoma City.     As soon as she was born, we started her clubfoot treatment. I wanted to be on top of things and give her the very best possible outcome. Immediately following her birth, Ella’s left foot was casted for four weeks. She then had an Achilles tenotomy procedure, where the Achilles tendon was cut so the ankle

During this time, I remember feeling a lot of guilt because our doctor would tell my husband and me that we needed to be doing more. More stretching and more exercises with Ella. My mom intuition kicked in, and I had a bad gut feeling that something just wasn’t right. Her little foot literally wouldn’t stretch anymore, so I consulted with a physical therapist who confirmed my feelings.     Ella underwent another Achilles tenotomy in January of 2019, followed by a tibial osteotomy in December of 2019. During the tibial osteotomy, her tibia was cut and repositioned. This caused Ella to be in extreme pain. We did not have a very good experience at that original hospital, and that was when that I started to research other hospitals and learned about Scottish Rite for Children.  

I reached out to a respected doctor that I know, and he referred us to Scottish Rite. He told us that the doctors at Scottish Rite were the absolute best! And they are! Ella’s first appointment with Dr. Riccio was in the fall of 2020. At that time, he told us what we didn’t want to hear – another surgery would be necessary for Ella. We had been through so much with our first doctor and hospital that I was very uncertain and had lots of anxiety about what to do.    After much prayer, we decided to schedule a tendon transfer and release surgery with Dr. Riccio.

He could sense that I was afraid, and I was so touched with how he took the time to talk to us and help ease my fears.

The day of her surgery, I was a complete mess. I had stayed up all night, going down a dark rabbit hole on the internet. I will never forget when Dr. Riccio walked in the pre-op area and said, “I got this”. After her surgery, he came to talk with us in recovery and had a huge smile on his face as he walked into the room. He told us that he thought we were going to be very happy with the results. Those memories will be in my mind forever. We are thrilled with the results! We are FOREVER thankful to Dr. Riccio and his entire team. The kindness Ella experienced with the Child Life team was also life changing. Our entire family thanks God for Dr. Riccio and I tell anyone who has a child with clubfoot to go to see him immediately!  

DO YOU HAVE A STORY? WE WANT TO HEAR IT! SHARE YOUR STORY WITH US.

Pediatric Foot Exam and Kids and Insoles: An Introduction to Orthotics

Pediatric Foot Exam and Kids and Insoles: An Introduction to Orthotics

This is a summary of a lecture provided by Anthony I. Riccio, M.D., and Kelsey Thompson, C.P.O., L.P.O., as part of the series Coffee, Kids and Orthopedics for medical professionals.

You can watch the full lecture and print the pdf.Pediatric Foot Exam

Anthony I. Riccio, M.D.

Assessment of Rotational Deformity

Foot Progression Angle

The initial phase of the foot exam is to get an understanding of the child’s foot progression angle. Foot progression angle refers to how the foot lies in relationship to a line projected directly in front of the foot. The angle can be affected by the structures in the foot itself and/or by rotational differences in the hip, the leg or within the foot. The angle can also be affected by how the foot strikes the ground during walking.

Gait Assessment of Foot Progression Angle
Imagine a line projected directly in front of the patient.

  • Neutral: Patient’s feet are parallel to that line as they take steps.
  • ​​External: Patient’s feet are turned externally or away from that line.
    • Sometimes referred to as a “duck walk” by parents.
  • Internal: Patient’s toes are turned towards this line.
    • Sometimes referred to as “pigeon-toeing.”

Though the foot progression angle might be perceived as abnormal by the parent, it is more important to look for a pathologic situation that might be responsible for it. If a patient has a foot progression angle that doesn’t seem normal, you want to see if that deviation is coming from an extremity more proximal to the foot.

Supine and Prone Assessment of Femoral Version
We typically start by assessing rotational profiles of the hip to see if there is any excessive internal or external rotation deformity that might be contributing to the way the foot rests against the ground as the child takes a step.

Supine Assessment

  1. Flex the hip and knee to 90° maintaining neutral rotation.
  2. ​Internally rotate the hip (which will externally rotate the leg in relation to the thigh).
  3. Estimate the angle of internal rotation.
  4. Externally rotate the hip (which brings the leg inward relative to the thigh).
  5. Estimate the angle of external rotation.
  6. Compare to contralateral.

Prone Assessment

  1. With hips extended, flex knees to 90°.
  2. ​Assess internal and external rotation of the hips.
  3. Estimate the angle between the leg and the table.

Assessment of Tibial Torsion
Tibial torsion, or rotation, may contribute to an abnormal foot progression angle.

Prone Assessment

  1. Flex the knee to 90°.
  2. ​Visualize or draw a line directly down the axis of the patient’s foot.
  3. Visualize or draw a line directly down the axis of the patient’s thigh.
  4. Assess the angle between those two lines.
    • If they are perfectly colinear, the angle is 0°.

Supine Assessment

  1. With hip and knee extended, rotate the hip until the kneecap points straight up in the air.​
    • ​This takes removes rotational differences in the hips to assess rotation in the lower leg.
  2. Estimate the angle of the feet in relation to the plane of the table.

Assessment of Metatarsus Adductus
Sometimes a foot deformity is causing the patient’s internal foot progression angle. The most common is metatarsus adductus, in which there is an internal rotation of the foot itself. These feet are normal structurally on the inside, but they were molded into somewhat of an internally angulated position during intrauterine gestation.

Prone Assessment

  1. Draw or visualize a line straight up the axis of the heel.
  2. Project that line distally to get an understanding of where the second toe lies in relationship to that line with the ankle in a neutral position.
    • As the foot turns more inward, this line will then intercept the third toe, the fourth toe, the fifth toe or no toes at all.

Examination of the Foot
Assessment of Standing Alignment of the Midfoot and Hindfoot
Standing Assessment – Anterior View

  • Assess the position of the foot in relationship to the tibia and the hips.
  • ​Assess what the midfoot and forefoot are doing in relationship to the hindfoot.

Standing Assessment – Posterior View

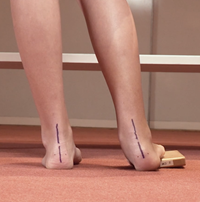
  • Assess the position of the calcaneus or heel bone in relationship to the Achilles.
  • Draw or visualize a line directly down the Achilles tendon.
  • Draw or visualize a line directly down the axis of the posterior tuberosity of the calcaneus.
  • Assess those lines to see if they are relatively collinear.
    • In a severe planovalgus or flatfoot deformity, the heel axis would be positioned very far externally, in relationship to the Achilles.

    • In a cavovarus foot deformity, say in the setting of Charcot-Marie-Tooth disease, that calcaneal axis would be turned inward significantly in relationship to the axis of the Achilles.

To get a sense of how turned out the midfoot is in relationship to the hindfoot, assess how many of the patient’s lateral digits you can see lateral to the heel bone:

Standing Assessment – Posterior View

  • It is normal to see the 5th toe and part of the 4th toe on both sides.
  • Seeing the third toe and the 4th toe means the midfoot rotated out.
    • This is typically seen with a flatfoot deformity.
  • If you can’t see the small toe, the midfoot is rotated inward.
    • This is seen with metatarsus adductus or in cavovarus deformities seen in children with peripheral neuropothies.

Assessment of Subtalar Motion
Toe Rise Test
The subtalar joint includes the talus, also called the “ankle bone,” and the calcaneus. This is where the heel either turns outward in a valgus deformity, like a flatfoot, or inward such as in a cavovarus deformity associated with peripheral neuropathy.

Visualizing the foot from behind helps you assess flexibility, especially in the presence of a flatfoot deformity. You can get a sense of subtalar motion by whether or not the angle between the axis of the posterior tuberosity of the calcaneus and the Achilles changes as the child goes from a standing flat position to standing up on their toes.

Standing Assessment – Toe Rise Test

  • Visualize the axis between the Achilles and the posterior tuberosity of the calcaneus is in standing.
  • ​Observe the axis as the patient elevates “way up” on their toes.
  • If the heels turn inward in relation to the Achilles into a varus position, it indicates flexibility in the subtalar joint. This joint is called the subtalar joint, and it is the joint through which the heel either turns outward in a valgus deformity, like a flatfoot, or inward such as in a cavovarus deformity associated with peripheral neuropathy.

Coleman Block Test
A classic test used to assess subtalar motion, which is really for children with a cavovarus foot deformity is the Coleman Block Test. This test is designed to assess flexibility through the subtalar joint in a patient who has their heel turned inward and helps discern whether or not that turning in is due to inflexibly in a fixed deformity through the subtalar joint, or if it is simply a result of the first ray striking the ground before the 5th ray, and forcing the heel to angulate inward as a result of a very high arched foot.

Standing Assessment – Coleman Block Test

  1. Assess the angle between the Achilles tendon and the posterior tuberosity of the calcaneus.
  2. Have the child to lift their foot up.
  3. Place a small block just under the lateral aspect of the forefoot.
  4. Ask the patient to put all their weight down on the foot.
    • This drops their big toe so you see what happens to their hindfoot.
      • If the heel does not turn into a more valgus position, it indicates a rigid subtalar joint which could be a varus deformity.

Table-Top Testing of Ankle and Subtalar Motion
The ankle joint, made up of the talus, tibia and fibula bones, is designed to flex and extend only. Side-to-side motion comes from the subtalar joint. An inability to move the subtalar joint might be indicative of an abnormal bony connection either between the heel bone and the ankle bone or between the heel bone and the navicular bone, which are termed tarsal coalitions. These are typically seen in a rigid flat foot deformity.

Seated Assessment

  1. Bring the ankle joint up into maximal dorsiflexion.​​
    • It also allows you to isolate the subtalar joint.
    • ​This locks the widest part of the ankle joint into the ankle mortis to prevent any inadvertent motion though the ankle joint.
  2. ​Grab the heel on either side both medially and laterally.
  3. Move it inward (supinate) and outward (pronate).
    • If the foot will turn in and turn out, it indicates excellent motion through that joint.

Vascular Assessment

  • Assess the tibial artery pulse which lies directly posterior to the medial malleolus.
  • ​Assess the dorsalis pedis pulse just a few centimeters proximal to the first dorsal web space.

Plantar Skin Assessment

  • Calluses on the outside of the foot are frequently indicative of lateral column overload.
  • This is seen in children with residual clubfoot deformities, or in cavovarus foot deformities.
  • Calluses on the medial border of the foot are seen in children with flatfoot deformities.

The Silverskiold Test for Achilles Contracture / Gastrocnemius Tightness
One of the most important parts of a foot and ankle exam is understanding tightness of the Achilles tendon, the gastrocnemius muscle or the gastric-soleus complex. The Achilles tendon is derived from two muscle groups: the gastroc muscles and the deeper soleus muscle. Children with flat foot deformities or who walk on their toes often have tightness in one or both of those two muscle groups. To differentiate between tightness in the gastrocnemius or tightness in both the gastrocnemius and the soleus, we perform what is called the Silverskiold test which assesses passive dorsiflexion of the ankle with the heel held in an internally rotated position.

Supine Assessment – The Silverskiold Test

  1. Bring the Achilles out to maximal length by turning the heel in.
  2. Grab the heel while supporting the rest of the foot with your wrist and the lower part of your forearm.
  3. Keep the knee extended to keep the gastrocnemius muscle as tensioned as possible at the knee.
  4. Assess passive ankle dorsiflexion.
  5. Document the difference between neutral dorsiflexion, which is 90°, to the leg to get your baseline assessment.
  6. Then bend the knee to relax the gastroc muscles.
  7. See how much more you can dorsiflex the foot.
    • The gastroc muscles are usually much tighter than the soleus.
      • If there was no difference, in the amount of passive dorsiflexion with her knee extended and the gastrocs on stretch and then the flexed, then the tightness would be a result of combined issues with both the gastroc and the soleus complex.

This not only helps in surgical decision making, but it can help clinically with regards to deciding how we are going to stretch out children with tight heel cords.

Assessment of Ankle Instability (The Anterior Drawer Test)
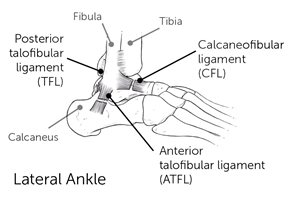
Ankle instability is common in relatively older kids, especially those who have had multiple ankle sprains. In order to test for ankle instability, we first have to understand the ligamentous anatomy on the lateral side of the ankle. Those two ligaments are both attached to the lateral malleolus, or the fibular bone.

  • The anterior talofibular ligament (ATFL) is the more anterior of the two and connects the fibula to the talus (ankle bone).
  • ​The calcaneofibular ligament (CFL) is the more posterior of those two and connects the fibula to the heel bone.

To test for stability, individually assess the function of each of these ligaments with an anterior drawer test.

Seated Assessment – Anterior Drawer Test in dorsiflexion and plantarflexion
Dorsiflexion places the CFL on maximum stretch and plantarflexion places the ATFL on maximum stretch.

  1. Cup the heel.
  2. Grab the ankle bone with your thumb while supporting the tibia.
  3. Bring the ankle into dorsiflexion. *
  4. Pull forward on the foot and the heel bone while pushing back on the tibia or leg bone.
    • See if there is excessive anterior translation through the ankle joint.

* Repeat the test but with the ankle in maximum plantarflexion.

Children without connective tissue disorders will only have ankle instability on one side, typically due to multiple injuries and sprains. Always compare the amount of translation from the bothersome ankle to the normal ankle to assess for any difference.

Assessment of Anterior and Posterior Ankle Impingement
An anterior ankle impingement is typically the result of a dysmorphology of the ankle joint, typically the talus. We see this frequently in children who have had prior interarticular surgeries, particularly those with clubfeet. Their ankle, which is supposed to be a relatively rounded joint becomes more flattened and can’t roll under the tibia bone. Instead it’s flat and as they try to advance the tibia over their foot in walking, the front of the ankle bone bumps and bangs into the front of the tibia bone.

Seated Assessment – Anterior Ankle Impingement

  1. Palpate for tenderness around the anterior aspect of the ankle.
  2. ​Perform forceful maximal dorsiflexion to see if that forceful abutment of the talus into the tibia reproduces anterior ankle pain.

With posterior ankle impingement, some children will have an os trigonum which is normal ossification (bone growth) behind the talus bone. The vast majority of these are completely asymptomatic, but occasionally it can be large enough or the child can be active enough that the ossicle will bang against the back of the ankle during points of maximal plantarflexion. This is commonly seen in gymnastics and dancers who spend a lot of time up on their toes. Because they are repeatedly, maximally plantarflexing their ankle, they can force the ossicle into the posterior aspect of the joint which can create pain.

Seated Assessment – Posterior Ankle Impingement

  1. Palpate for tenderness around the posterior aspect of the ankle.
  2. Forcefully plantarflex the ankle to see if we can reproduce posterior ankle pain.

Assessment for Overuse Conditions
Sever’s Disease
Calcaneal apophysitis, or Sever’s disease, is a type of overuse injury caused by repetitive movements. It is the most common cause of heel pain in active children ages 8-12. This is often seen with tightness in the gastrocnemius, and the growth plate, the calcaneal apophysis becomes inflamed.

Seated Assessment – Palpation of the Calcaneal Apophysis

  1. Examine the insertion of the Achilles tendon in the area of the calcaneal tuberosity.
  2. Slide your thumb off the very back of the heel.
    • Approximately 1 – 1.5 centimeters forward.
  3. Push and squeeze on both the inside and outside of the calcaneal tuberosity, this will reproduce the pain in children with Sever’s disease.

Plantar Fasciitis

More often seen in adults, children and adolescents may also experience this tightness and pain on the plantar aspect of the foot. Oftentimes it doesn’t stop a child from doing the activities they want to do, but it becomes bothersome after they’ve stopped their activities and sit down or are taking a car ride or get out of bed first thing in the morning.
Perform a Silverskiold test to assess plantar fasciitis because it is directly linked to tightness of the gastroc soleus complex.

  • Take the big toe and dorsiflex it as much as possible.
  • This puts the plantar fascia on stretch because of some attachments to the flexor of the big toe.

Often passively dorsiflexing or extending that big toe will be enough to set these children off if they have a fasciitis in this area. If not, it certainly allows us to really get a sense of how tight that plantar fascia is and directly palpate it to see if it is painful for the child.

Kids and Insoles: An Introduction to Orthotics

Kelsey Thompson C.P.O., L.P.O.

Orthotist Perspective
What should you look at first?

  • Look at what shoes the patient presents with.Are they supportive shoes or flexible/non-supportive shoes?
  • Ask if those are the most commonly worn shoes, or if they have others.
  • Ask when the patient has pain.
    • With shoes, barefoot, all the time?
    • Do any shoes make their pain improve?
    • Have they tried better shoes or any off the shelf insoles?
    • If so, what have they tried?

Shopping for Shoes
Proper sizing is important.

  • The quality of shoes is better in adult sizes versus kids’ sizes.
  • ​Kids shoes are sized off Men’s sizes.
  • 5Y is a 6.5 Women’s, so girls can get into women’s shoes quicker than boys.
  • Women’s – B width, Men’s – D width.

Price

  • Price can be directly related to quality but not when it comes to popularity.
  • Related to quality of cushioning and how long shoe will last, not support.
  • Number of miles and still have the same amount of cushioning.

Where to Shop

  • Specialty running shoe stores (Run On, Frisco Running club, etc.) are recommended.
    • Can get past year models online for less.

Adding Support

  • Arch support needs to come from an insole bought separately.
  • A severe pronator needs motion control or stability shoeDenser midsole material on medial side of shoe.
    • Offered by Asics, Brooks and New Balance Shoes.

Physical Examination and Assessment

  • Ask the patient to walk barefooted.
    • Look for midfoot collapse, pronation, supination or rotation.
    • Check ankle ROM in subtalar neutral vs maximum.
      • Most of the time their calves are tight especially when in subtalar neutral.
  • Ask if they were given a home exercise program (HEP). If so, reinforce the instructions that they should follow.
  • Encourage them to stretch.

Determine Correctable or Rigid Deformity
Correctable Deformity

  • A correctible deformity can be treated with off-the-shelf insoles.
    • These are made off a generic model.
    • You want to look for one with actual support not one that is just a cushion.
    • You will need to purchase one size up and trim to fit the entire arch.
  • Recommended brands:
    • Superfeet, Spenco, New Balance, KidSole.
  • Recommended stores:
    • Run On, Dick’s Sporting Goods, Academy Sports + Outdoors, REI.

Sometimes customized off-the-shelf insoles are needed. These are made off a generic model but they are made with materials that can be modified This gives us the ability to adjust as necessary.
Off-the-shelf inserts are great for someone with a flexible flat foot. This means their foot can be fully corrected to have a good arch, but their arch collapses when bearing weight. The insole will support their arch.

Rigid Deformity
A rigid deformity will require custom foot orthoses.

  • Made from a foam impression or cast.
  • ​Takes 2-3 weeks for fabrication.
  • Requires a little more room in shoe than off-the-shelf.
  • A variety of materials available to fit patient’s needs.
    • Foams and plastics.
    • Cast and Impressions.

Custom orthotics are for patients with a fixed foot position where the arch is fully collapsed to the point that their navicular is almost dropped to the ground and they cannot be corrected.

About the Speakers
Anthony I. Riccio, M.D., is a pediatric orthopedic surgeon and the director of the Center for Excellence in Foot at Scottish Rite for Children. He specializes in clubfoot & other foot disorders and limb lengthening & reconstruction. He sees patients at our Dallas campus.

Kelsey Thompson C.P.O., L.P.O., is a certified prosthetist orthotist at the Scottish Rite for Children Orthopedic and Sports Medicine Center in Frisco. She studied biomechanical engineering at Texas A&M and trained in prosthetics and orthotics at UT Southwestern in Dallas where she also completed a residency in prosthetics and orthotics.

Juvenile Bunion Deformities

Juvenile Bunion Deformities

This article was recently published in the Pediatric Society of Greater Dallas newsletter. Committed to improving orthopedics care of pediatric patients in all settings, Scottish Rite for Children specialists are regular contributors to this publication for local pediatricians.

Print the PDF

What are Juvenile Bunions?
Juvenile bunions, a deformity of the foot, are a common cause of frustration for patients, their parents and medical providers. Fortunately, the vast majority of bunion deformities in children and adolescents are asymptomatic and therefore require no intervention aside from parental reassurance. For those deformities that cause difficulty with shoe wear and pain refractory to conservative treatment modalities, surgical correction is a reasonable option. It cannot be overstated, however, that appropriate surgical management mandates an in-depth understanding of the component deformities to avoid the historically high rate of recurrence and failure following operative treatment.

How Do Adult Juvenile Bunions Differ From Adult Bunions?
Clinically, adult and juvenile bunions appear very similar with lateral deviation of the great toe and a medial eminence at the metatarsophalangeal (MTP) joint resulting from uncoverage of the medial metatarsal head. These are, however, very different deformities. Adult bunions are
most commonly acquired deformities from tight shoe wear which leads to attenuation of the medial sided soft tissues at the MTP joint, lateral deviation of the hallux and usually pronation of the toe as well.

What Causes Bunions?
The cause of juvenile bunions is neither completely understood nor agreed upon. Hypermobility of the first ray, an associated flatfoot and obliquity of the lateral cuneiform have all been postulated as causative factors. However, the deformity is most likely congenital and results from external orientation of the articular surface of the metatarsal head.

How Do Bunions Appear in Radiographs?

Radiographically, both adult and juvenile bunions are characterized by angulation between the first metatarsal and the proximal phalanx (hallux valgus angle or HVA) as well as an increase in the angle subtended by the axes of the first and second metatarsals (intermetatarsal angle or IMA). The distinguishing characteristic of the juvenile deformity is a more lateral orientation of the distal metatarsal articular surface. Whereas in adult bunions, the articular surface is usually perpendicular to the metatarsal shaft. In younger patients, the angle between the shaft and the articular surface (distal metatarsal articular angle or DMAA) is elevated. This results in lateral deviation of the toe with maintained congruency of the MTP joint. In contrast, adult bunions usually demonstrate varying degrees of joint incongruency between the base of the proximal phalanx and the metatarsal head.

Can Bunions Be Prevented?
Because juvenile bunions are congenitally acquired, there are no means by which the deformity can be prevented. Moreover, once noticed, no well-accepted means of stopping deformity progression are available. Commercially available toe spacers, bunion straps and physical therapy cannot alter the abnormal anatomy of the distal metatarsal articular surface and therefore have no role in the management of this clinical entity. Straps and spacers that force the great toe more medially and the give the outward appearance of a straighter hallux do so by creating incongruity at the MTP joint which can alter range of motion and oftentimes cause discomfort.

What Shoes and Pads Help with Juvenile Bunions?
As mentioned above, in the absence of pain or difficulty with shoe wear, parental reassurance is the best course of action. In the presence of symptomatic deformities, nonoperative measures are all that is usually required to keep children active and happy. Shoe wear modifications are the simplest and oftentimes most effective course of action. Adolescents and their parents should be encouraged to find a well cushioned stability shoe with a wide toe box and flexible uppers. For those children required to wear leather shoes, boots or cleats due to school uniform requirements or recreational desires, most cobblers can create extra space in the region of the medial eminence using a “ball and ring” shoe stretcher. Should shoe modifications fail to provide complete relief, silicone bunion pads placed over the medial eminence can also be helpful. In children with flexible flatfoot deformities and symptomatic bunions, using a soft shoe insert to elevate the medial half of the heel and support the arch can offload any plantar-medial pressure by elevating the medial column of the foot.

Is Surgery Necessary for Bunions?
When prolonged conservative treatments fail to provide relief, surgical intervention is a reasonable option. Though recommendations vary with regard to the timing of surgery, due to historically poor results following the surgical treatment of juvenile bunions, many advocate to delay surgery until adolescents are within one or two years of skeletal maturity.

Females typically reach skeletal maturity at age 14 while males reach skeletal maturity at age 16. Better understanding of the congenital nature of the juvenile bunion and the importance of correcting the DMAA during operative treatment will likely lead to a dramatic reduction in recurrence and surgical failure, ultimately driving down the age at which operative intervention can be successfully undertaken.

Who is Qualified to Perform Surgery to Correct Juvenile Bunions?
As such, surgery should be performed only by those with a clear understanding of this specific deformity such as a fellowship-trained pediatric orthopedic surgeon or a fellowship-trained orthopedic foot and ankle specialist who is comfortable caring for pediatric patients.

Anthony I. Riccio, M.D., is a pediatric orthopedic surgeon caring for children and adolescents at Scottish Rite for Children. He is the director for the Center for Excellence for Foot.